Celebrating Thaipusam

Despite working in Kuala Lumpur, Malaysia for some years, this is the first time I went for a Thaipusam celebration. I have to wake up at 5AM and drive several km to reach Batu Caves. By the time I reach there, it was already packed with people from all walks of life. One thing I noticed was most devotees were adorned with dresses and vesthi of yellow and orange color, known to be the favorite color of Lord Murugan.

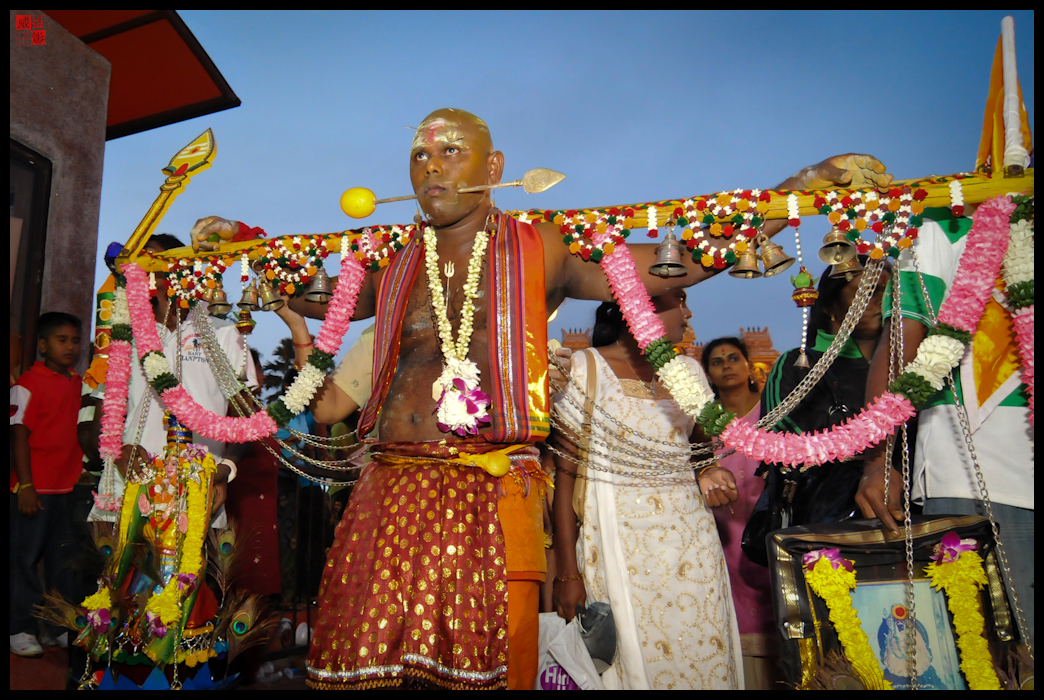
On the main entrance to Batu Caves (obviously it has been blocked for vehicles), I can see thousands of people flocking towards the temple in procession, some carrying kavadis (wooden/bamboo structure decorated with peacock feather), some carrying milk pots (known as Pal Kudam), some were tranced to impersonate various Hindu deities. On another corner of the street, I can see shelter for barbers offering devotees to shave their head bald, an act of atonement to the Hindu God.

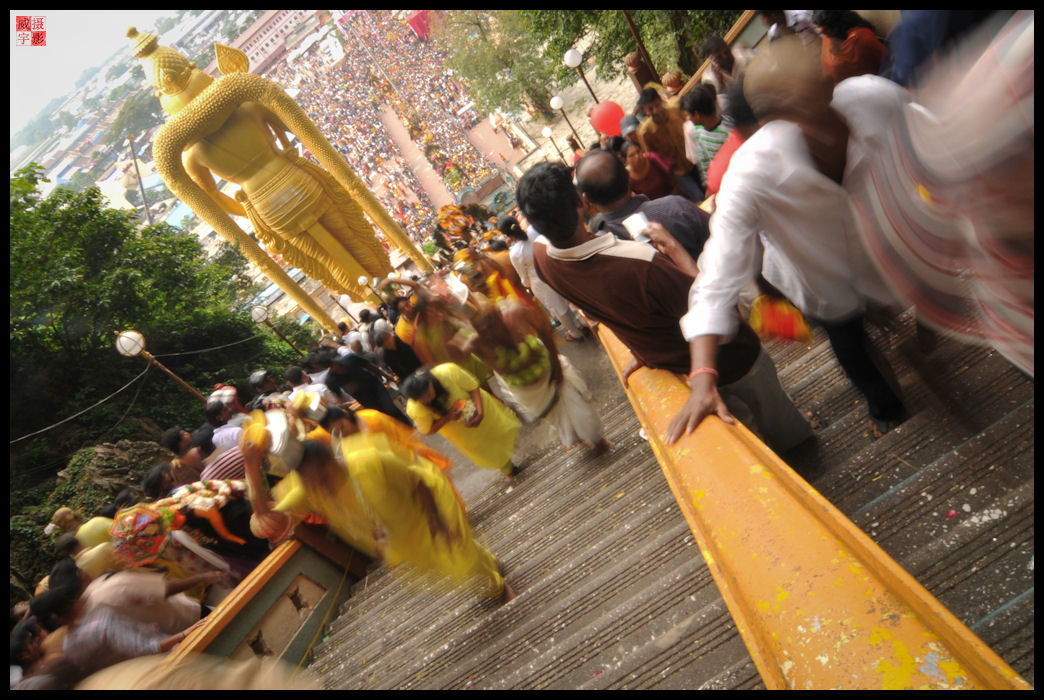
I followed the devotees towards the foot hill of the temple, where one needs to climb up 272 steps to reach the Murugan Temple (The Caves). There were 3 lanes for devotees to line up in front of the stairways: the right for exit, the left for entry, the middle as “backup” either for entry or exit. We as a visitor and photographer, managed to take the middle lane and snaps some good photos. I proceeded to climb up the stair and was lucky to capture a few of my favorite shots (as shown below). Upon entering the caves, there were already hundreds or thousands of devotees queuing up, ready to offer milk, water, fruits and floral that they have carried to Lord Murugan.

Hiking Tabur West

Tabur @ Dawn - The Moody Way

If I remember correctly, my last Tabur hike was 4-5 months back in 2010. Since then, no more hiking for me until last Saturday, when Mr. Wong sent me a text message: “Tabur tomorrow?”. I hesitated for a moment, and thought why not?! I replied and agreed to meet him by 0630 at a Deen Mamak. We (and Ms. Ong) started to hike up by 0700, took us almost 20 minutes to reach the 1st resting ground. I think that was the longest time ever taken for us to reach that spot! Well we have our excuse anyway.

We continue to hike up the 1st peak, which took us another 20 minutes perhaps. Of course we stopped for some rest in between; talking about how frequent we used to hike tabur last time; talking about Mr. Wong’s fully planned agenda for the next 3 months! In fact, I noticed most Tabur’s hiker has been quite “discipline” in keeping the trail clean, except for some annoying ones who “smoke and hike”, leaving not only their footprint but their cigarette bud! I wonder if that’s gonna make their health worse.

The next 45 minutes was a very difficult one, at least for me, struggling to keep up the pace with both of them. We passed the 2nd peak without stopping for rest, afraid of other hikers get passed us and slowing us down on the “entrance” to the 3rd peak. Well, the “entrance” to the 3rd peak was actually a 70 degree steep slope, allowing only 1-2 person to either hike up or down at the same time.

At the 3rd peak, there’s a perfect spot to take photograph of the klang gate reservoir and Tabur West (picture above). I remember the shrub on the right-hand corner is not visible the last time I took a similar picture, perhaps they have grown taller! We stopped and rest there for quite some time, making friends with other hikers, joking with the “Big Sister” nickname given to Mr. Wong. We decided to continue our hike until we reach a place we called “回夓ę˜Æå²ø”, translated as “repent and be saved”. The name was given to that particular spot is because it’s a fairly difficult (for beginner), or perhaps “dangerous” spot to cross over to the other side of the cliff, which will eventually reaching the 4th peak.

This place is also another “bottleneck” for hikers who wanted to continue to the next peak and finish the hike. For us, we normally stops here and turns back. The reason is because the way returning to the base is more excited if we follow the original trail back. It took us roughly 30 minutes to reach the base, if my estimation was correct.

DPP Quick Tip: Clone versus Patch

Working with photo editing software has become a pre-requisite for most if not all digital photographers. Unlike film photography, there is little chance that you can touch up an image that has been exposed on the film. Therefore, ensuring a correct exposure and composition before you click on the shutter button, is very important. Does this matter to digital photographers? The answer is Yes!

Many photographers nowadays had the wrong impression that digital post-processing (DPP) will “fix” or “make” your photograph better. However, capturing a picture with a perfectly balanced exposure and a stunning composition, is the very first step that you need to practice as a photographer. DPP is only used to drop the final touch on my photograph to make it perfect.

There are circumstances however, that DPP was used to fix (or fake) a good photograph. The tip that I am going to show you is particularly useful when you need to work with several photographers at the same time. There are inconveniences when these photographers are using different focal-length lenses during the shooting session. Take for example the below photograph; I’m shooting with a tele-lens while my partner is shooting with a wide lens.

Before Patch

There are nothing wrong with the subject. Infact I like the natural expression of the couple. The problem is my partner was captured in the frame :) This can be resolve simply by patching. Patching here means copy a section of an image from another photograph, and paste it on top of the current photograph. To ensure the end result “looks” real, consider copy with feather mode so that the edge of the copied image blended with your current photograph.

After Patch

What I will do next is to remove distractive elements on my photograph. Two things you can do here. First is to crop your image tighter to remove “unwanted” objects at the side of your photograph. Second is to “clean” your image with a clone brush (Most photo editing software should have this function). Cloning means making identical copies of a portion (normally small area) of your current image, and paste it on “unwanted” objects.

Editing and Cloning

Feel free to comment on the final edited image above. Personally I will retain the background tree for overall balance of the image. However, removing the tree might also makes the image looks “cleaner”. What you think?

PWP Darren & Mei Ling

This is the first series of Pre-Wedding Photography (PWP) for Darren & Mei Ling. There were not much preparation as it was meant to be a casual outing + photo shooting session. The general plan for the day are separated into 3 places: morning @ UPM, afternoon @ Putrajaya, and evening @ Tanjung Sepat. We have 4 photographers (including myself) andĀ 1 assistant joining the shooting. The weather was very promising in the morning, but turned overcast after noon. Below is a teaser shot for the event.

Teaser Shots

I quite like this shot taken at UPM,Ā when I asked Darren & Mei Ling to hold hands and walk up the hill. The focus is on Darren’s face with fill-in flash. Several shots have been taken at this spot, and the best was chosen. The sun glare was a DPP job.

ISO 100 | 1/1600 | F2.8 @ 17mm

This shot was taken at Putrajaya Lake. Simple and clean, just one take.

ISO 200 | 1/2000 | F2.8 @ 90mm

Here’s my favourite shot from Tanjung Sepat. Again, I have asked the couple to walk hand in hand towards me, and I shoot this from low angle.Ā I have taken several shots initially but not satisfied. I’ve switched shooting from different position and try to find a better composition. The bonus to this shot was the dramatic skies of the golden hours! The cons is sacrifying the shadow without usingĀ a fill-in flash, but I have pushed up a bit of the shadow by DPP.Ā Other photos in the set can be find here.

ISO320 | 1/80 | F2.8 @ 32mm

Happy New Year 2010

It’s a rare opportunity to shoot fireworks from within Petronas Twin Towers, and I have chosen this very moment (New Year Eve)Ā to do so. You may wonder why, but my answer(s) are quite simple:

  1. I have never try that before, and I wonder how it may turn out
  2. I have the privilege to access the Twin Tower, because my office is there
  3. I will soon not have the privilege to access the Twin Tower, because…you will know later :)

So I am now sitting in my office waiting for the New Year countdown, it’s a good time to do a quick study on how to capture fantastic fireworks shot.Ā I know I definitely need a tripod. Next I gotta choose a nice spot, some place dark enough to avoid unwanted glare light from the environment, and that’s done. Last but not least are all the “recommended” camera settings, and I’m ready to go!

Happy New Year 2010 to all my readers, let’s see how my firework shots turn out tonight.

… After 2 hours shooting… and 2 hours of editing… here’s the result.

00:00:05 First Blast of 2010

00:00:10 First Blast Goes Off

00:01:24 Homing Missles Blast Off

00:01:59 Three Eyes Monster

00:02:38 Violet Rain

00:03:15 My Favourite Blast

There are more photos at here. All shots above are taken on a tripod, preset to manual focus. ISO 100, AWB and bulb mode (average 3 seconds) using aperture f/8 – f/13. Post processing using Nikon Capture NX2 and Corel Paint Shop Pro.